Gooney Bird Drone
  • Home
  • Latest News
  • Specifications
  • Images and Video
  • About/FAQs
  • Media
  • Contact

GB Build Blog

Firewall Forward

2/26/2020

0 Comments

 
Picture
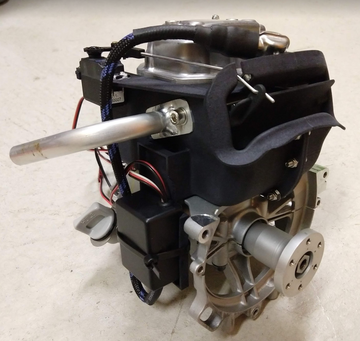
Front of propulsion unit showing the ignition, cooling shroud with cowl flap, propeller hub adapter, and TIG-welded exhaust header.

​After a solid month of family visits, playing with the 'wiggle worm', and her baptism, it's time to get back to work!

Above is a picture of the front end of the propulsion unit -- a modified Honda GX25 4-stroke engine. I designed the cooling shroud in one weekend in September 2018 using SolidWorks and had it 3D printed using SLS nylon. The cowl flap is capable of completely closing in order to maintain a high CHT at low power settings.

While CAD-ing the shroud assembly, my wife was watching the movie "Lorenzo's Oil" in the same room. As a result, I get a distinctly sad feeling every time I look at those parts. The act of designing and building new systems is an emotional journey. Sometimes the actual emotions involved end up being quite random!
​
Picture
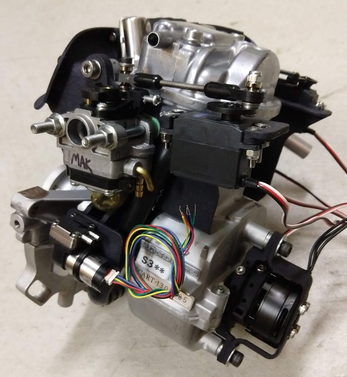
Above is a picture of the back end. Shown are the WYL carb, custom ignition timing ring, 120V AC alternator, throttle servo, and fuel pump. The fuel pump's sole purpose is to purge the header tank of air bubbles which may accumulate over time from vaporization and sloshing. If it fails, the built-in diaphragm pump in the carb will automatically bypass it.

Everything in the propulsion section is close to being finalized, but there remains some additional work on carb mods and doing endurance testing. Of course, all of the wiring will need to eventually be sleeved and secured to reduce the possibility of wire fatigue.

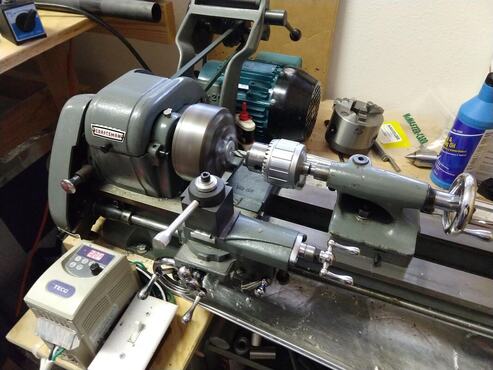
I have also been testing an alternate, high-power 2-stroke engine. However, given my time constraints, the integration work for this engine will likely be shelved soon in favor of the ready-to-go 4-stroke engine.
​
Picture
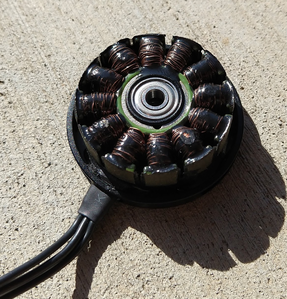
This is the alternator winding assembly. To reduce the possibility of wire fatigue, all of them were potted using high temperature epoxy. Electronics and wiring do not like the "ol' shaky shaky"!
Picture
The fuel tank sealing process is shown above. The fuselage could be accurately described as being a 'flying 5-gallon jerry can'. It is made of only 3 carbon fiber parts -- not including the thin anti-slosh baffles. Unfortunately, I did not have time to make multiple pulls of the vacuum-infused parts (given my time and cost constraints) so I had to go with the first part to come out of each mold. There were porosity issues with two of them so it had to be sealed up with an aviation fuel tank sealing product.
0 Comments

Prototyping Tools -- Lathe

2/2/2020

0 Comments

 
Picture
A custom-designed CNC turned part is modified using a 4-jaw chuck. The part is GB's ignition timing ring and alternator adapter. Doing this at home saved time and money after a design revision.

Today's 'maker' is fortunate enough to have many options available to them that someone 20 years, or even 10, ago did not have.  Tools such as 3D CAD modeling, home 3D printing, and rapid online CNC machining are all easy to acquire and/or use.

However, one piece of kit that perhaps does not get the credit or attention it deserves is the lowly hand-operated metal lathe.

Rapid online CNC turning and milling services from suppliers such as Protolabs, Xometry, and e-Machine Shop are indispensable for making 'real' prototypes quickly with metal parts. That said, there are many parts that can be made quickly and cheaply at home. Even the most simple turned metal part can cost ~$100 when ordered at qty=1. This is where a manual lathe comes in to play. Simple parts can be cut quickly and cheaply and expensive custom CNC-cut parts can be modified.

I have a Craftsman/Atlas 618 lathe which I estimate was manufactured in the early 1960's. I found it on Craigslist for $600 complete with maple work bench. It has since been upgraded with a variable-frequency-drive, and quick change tool set.

It features:
  • Variable Frequency Drive -- for changing RPM quickly on the fly without changing belts
  • Quick-change tool set -- for rapid changing of cutting tools. This is INDISPENSABLE. Not only can you change a cutting tool quickly for the next operation, they are all pre-indexed and ready to go.
  • 3-jaw chuck -- for rapid work holding of material that doesn't requiring indexing (cutting new parts)
  • 4-jaw chuck -- for accurate work holding of irregularly-shaped material or to minimize runout when re-machining an existing part
  • ​Dial indicator -- used primarily for measuring runout and accurately setting a 4-jaw chuck
  • Machining attachment -- although this can be used for basic 4-axis machining operations (with an end mill on the headstock spindle), it is most useful for locating drill guide bushings when making hole patterns. The headstock has 60 detent pin positions for creating axisymmetric hole patterns.

The downsides of the 618 are:
  • As a desktop lathe, it doesn't have the rigidity of a larger lathe. This limits maximum cutting depth/speed and it takes great care to hit 0.025mm (0.001") tolerances.
  • It is standard. I design everything in metric with as few metric fastener types and sizes as possible. I have to calculate and list all basic dimensions and tolerances by hand in inches before cutting. 

​I am happy with my Atlas 618, but in the future I may trade it in for a lathe which is larger, newer, and metric.
0 Comments

It's A Girl! (okay we already knew that)

2/2/2020

0 Comments

 
Picture
My wife and I had our first child! - Born 3:31AM on January 24th.

Caring for an infant is certainly not easy and very taxing on the sleep schedule, but honestly it feels less complicated than modifying and tuning a finicky small engine -- and engines don't smile back at you!

Infant cries. = check diaper
Still crying? = put food in infant
Still crying? = hold/swaddle/rock until sleeping
Repeat every 3 hours.

Anyway, little progress on GB over the past week of course. When the baby is napping, I've been doing more engine runs with different main jets, needle valve settings, and propellers. Fuel flows are being measured with a digital scale and confirmed to be good enough.

Hopefully we will make more progress in the coming weeks.

​Stay tuned! (get it? get it? -- engine pun) [rimshot] "i'll be here all week!"

0 Comments

    Author

    Rob Coatney is an aerospace engineer in Washington state. In his spare time, he is working to set new drone flight endurance records!

    Archives

    June 2020
    April 2020
    March 2020
    February 2020
    January 2020

    RSS Feed

Powered by Create your own unique website with customizable templates.